
A shingle roof looks simple from the ground. Lay them straight, nail them down, call it a day. Anyone who has torn into a twelve-year-old roof that failed at the valleys knows better. The difference between a roof that lasts its full warranty and one that curls, leaks, or sheds shingles in a storm often comes down to quiet details: nail placement, ventilation balance, starter course alignment, and flashing that respects how water actually behaves in wind. After twenty years on ladders and scaffolds, I can tell you that “good enough” will show up in the ceiling stains two winters later. Flawless is relentless about fundamentals.
What follows are ten field-tested tips for roof shingle installation, the sort of practices that make a shingle roofing contractor sleep at night. They apply whether you are tackling roof shingle replacement on an older Cape or dialing in roof shingle repair after a tree limb scraped the eaves. The focus is asphalt shingles, since they dominate residential work, but many principles carry over to other materials.
Start with the deck you deserve
Shingles are finish work. They will only perform as well as the deck beneath them. Before you think about color or pattern, lift a few old shingles and read the story underneath. I see three common substrate issues: spongy sheathing from chronic moisture, delaminated plywood at eaves, and old board decks with knotholes big enough to swallow a nail.
Walk the roof with intention. Feel for give. Probe suspect areas with a flat bar, not a boot heel. When the roof has any bounce, shore from inside, then replace those panels. OSB works, but I prefer 1/2-inch plywood for its fastener-holding power and resistance to edge swell at vulnerable edges. At eaves where ice dams are a fact of life, 5/8-inch pays you back in reduced waviness over time. Fasten the deck properly to the rafters, pull tight seams, and fix all plane changes before the first shingle ever appears. If you are on an older home with board sheathing, add a layer of 3/8-inch plywood over top to create a uniform nailing field.
A flat, solid deck also prevents telegraphing. Any hump in a seam or proud nail will broadcast through the shingle field on a hot day. I learned this on a townhouse row where a framing crew left a minor ridge at a ridge beam. Five years later, it looked like a permanent wrinkle. We ended up slicing and reframing a section to erase it. Prep is cheaper.
Read the weather like a roofer, not a tourist
Heat softens asphalt. Cold makes it brittle. Adhesive strips need warmth to bond. Most manufacturers want a sealant temperature above roughly 40 to 45 degrees Fahrenheit for reliable activation, and installation temperatures above freezing for the shingles themselves. That does not mean you cannot roof in colder weather, but it is not business as usual.
When scheduling roof shingle installation, watch the mixed forecast, not just day-of. If a storm front is due overnight, plan your tear-off so you can dry-in early, with synthetic underlayment tight and taped and ice and water membrane in critical areas. On summer days, start early and manage bundles in the shade. Asphalt tabs laid in full sun can smear and scuff from foot traffic, especially darker colors. In winter, keep bundles warm, and hand-seal tabs in wind zones and per the manufacturer’s cold-weather instructions. I have seen roofs installed on a sunny 35-degree day that never fully sealed because the next week was a cold snap that lingered. Six months later, a spring gale took half a slope. The roofer had followed calendar wisdom instead of adhesive chemistry.
Underlayment is not optional armor
Underlayment is the backup plan that makes you look like a hero when the primary defense is breached. Builders used to staple down twenty-pound felt and call it good. That still has a place, but synthetics earned their reputation. They resist tearing when wind catches a corner during installation, and they remain more dimensionally stable over time.
Use self-adhered ice and water membrane along the eaves to a point at least 24 inches inside the warm wall, more in heavy ice-dam regions. Run it up and into valleys, around chimneys, and under low-slope transitions. Lap the membrane correctly, roll it firmly, and keep it clean. Then cover the rest with a synthetic underlayment, installed flat and straight with cap fasteners, not narrow crown staples. Keep laps in the direction that sheds water. Think like rain and assume wind is trying to push water uphill. When you do roof shingle repair, take note of what failed underlayment looked like. It teaches you where to upgrade the next time.
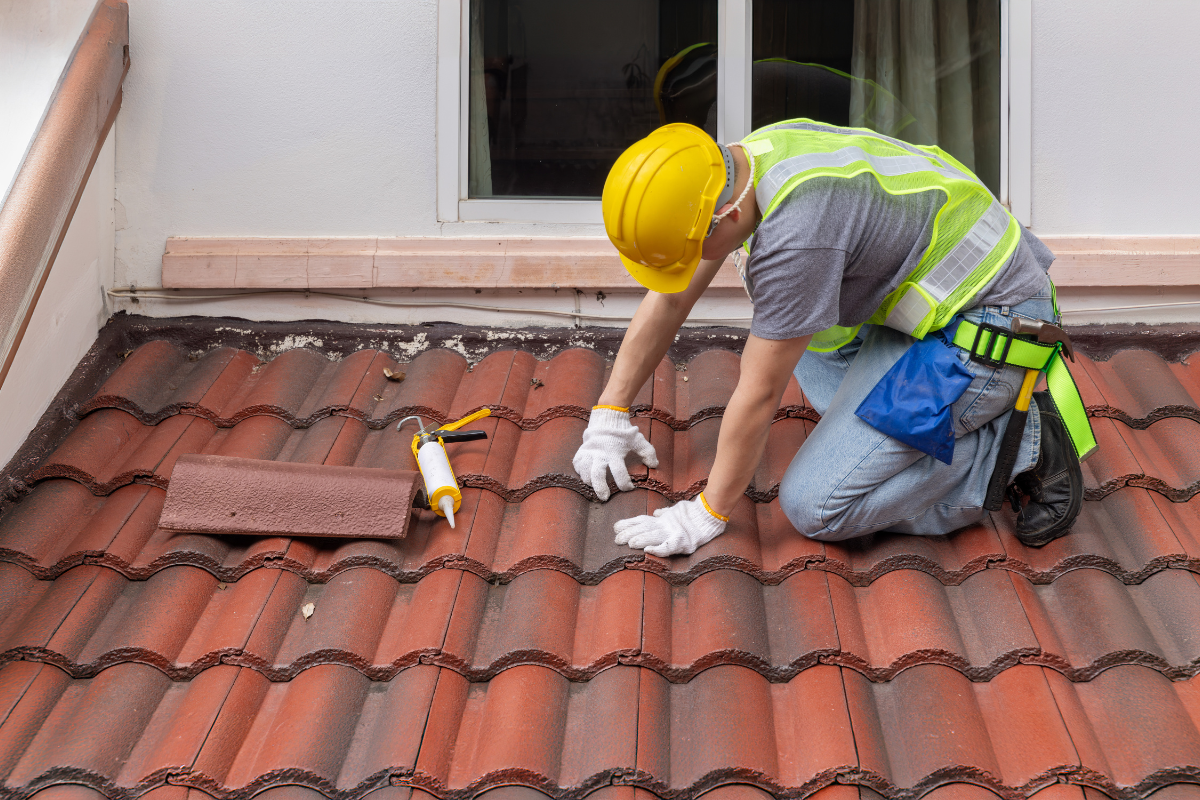
Respect the starter course
A beautiful field of shingles will leak at the eaves if the starter course is wrong. The starter’s job is to give the first field course an adhesive bond at the eave and to bridge the joint between the first-course tabs. Many times I meet homeowners who DIYed a small shingle roof replacement on a shed and lined up the starter exactly with the first row. That centers a butt joint over a gap and invites water right in.
Use factory starters or make your own from shingles with the tabs trimmed off, adhesive strip at the eave. The starter should overhang the drip edge slightly, generally about a quarter inch, and continue up the rake as well. Stagger all joints at least six inches. Pay attention to the adhesive strip position: at the eave for wind uplift resistance, and at the rake to prevent wind-driven rain from curling under the edge. If you have ever replaced blown-off shingles along a rake after a storm, check whether the previous installer skipped or misaligned the starter. It is often the smoking gun.
Nail like the manufacturer signs your paycheck
Every shingle package includes a nailing diagram for a reason. The sweet spot is not a rumor. Nail placement controls wind resistance and watertightness. Four nails are typical, six in higher wind zones and on steeper slopes. Nails belong in the nailing strip, not above it, not below it. High nails miss the double-thickness laminate that gives shingles their hold. Low nails risk exposure and leaks. The shingle roofing contractor who trains crews to “nail to the line” suffers fewer callbacks than the one who says “close enough.”
Get your gun set so the heads are flush, not overdriven. Overdriven nails cut into the mat, especially on warm days, and can pull through when the wind gets frisky. Hand-drive if a piece of decking is harder than the rest. Use corrosion-resistant roofing nails, typically galvanized, with a head wide enough to clamp the shingle. For coastal homes, stainless nails are not excessive, they are insurance. I keep a coil gauge in my pouch and check depth when the day starts heating up. You can hear the difference between a clean set and a blow-through, but do not rely on ears alone.
Flashing is a promise, not a decoration
If a roof leaks in its first decade, the odds are good that flashing is to blame. Walls, chimneys, skylights, dormers, and valleys are where water does its sneakiest work. Each detail has a best practice, and shortcuts leave fingerprints.
Step flashing should be individual pieces woven with each shingle course, not a continuous strip that expects sealant to defy gravity year after year. Kickout flashing at the bottom of sidewalls directs water into gutters instead of into the wall cavity. Chimneys deserve a saddle if they are wider than about 30 inches on the upslope side, and they deserve new counterflashing cut into mortar joints, not glued to brick faces. Valleys are either open metal or closed cut. Pick one and execute well. With an open valley, center a metal liner, hemmed edges, fastened outside the water path, and let the shingle field stand off with a clean, consistent reveal. With a closed-cut valley, run one side long, snap a line, and make clean cuts so water follows the path, not the saw kerf. I replaced a roof on a Victorian where a continuous “L” flashing along the dormer had been bedded in sealant. The caulk looked fine for six years. In year seven, it separated in a cold snap and water ran along the sheathing. The repair cost far more than proper step flashing would have on day one.
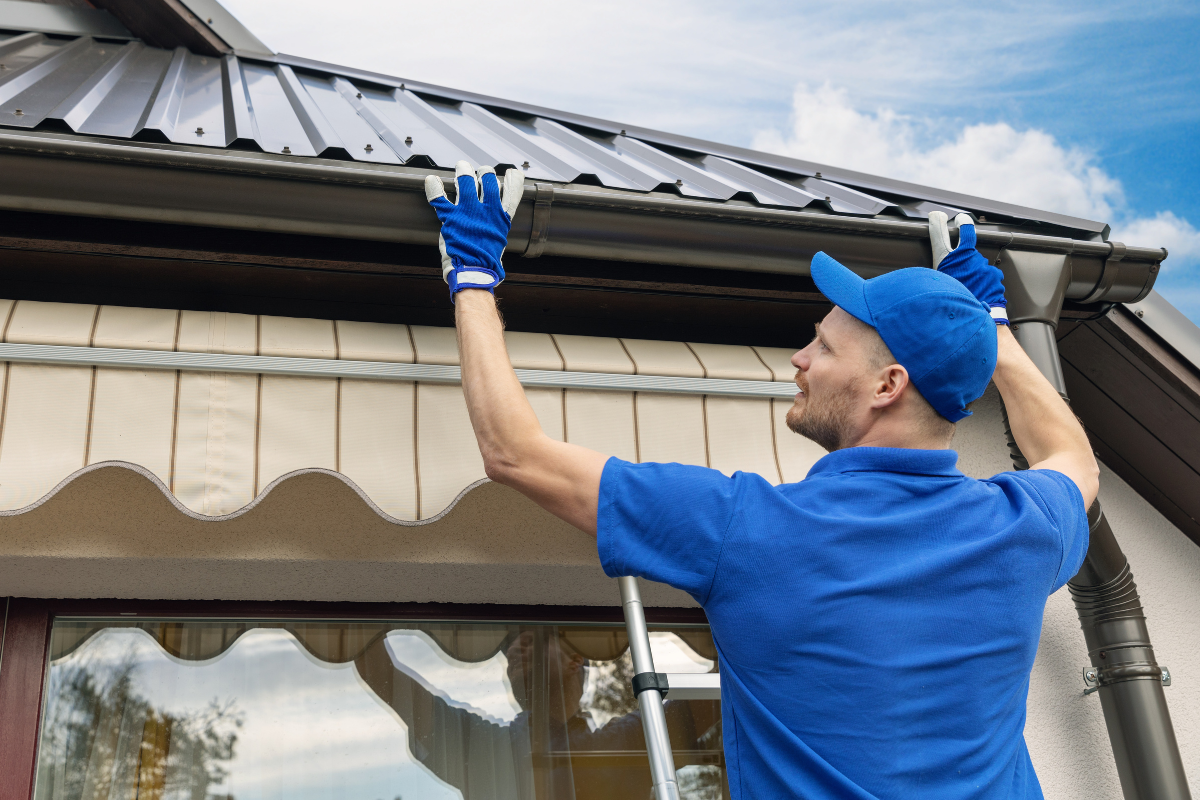
Ventilation balances the system
Roofs are not only about https://messiahkxqk909.lucialpiazzale.com/shingle-roofing-contractor-certifications-and-why-they-matter shedding exterior water. They also manage interior moisture and heat. Poor ventilation drives premature shingle aging, sheathing rot, and ice dams. Your attic needs intake at the eaves and exhaust at the ridge or another high point. The system wants balance, and the rules of thumb are not guesses. Many manufacturers recommend net free area around 1 square foot per 150 square feet of attic floor when there is no vapor barrier, and around 1 per 300 square feet when there is one, split roughly evenly between intake and exhaust. Local codes modify these numbers, but the principle holds.
Soffit vents clogged with insulation are not vents. The best ridge vent in the world cannot pull air if it has nothing to draw from. I use baffles at eaves to keep insulation from choking the path, then install continuous ridge vent with matching cuts along the ridge, stopping shy of hips as required. Avoid mixing multiple high exhaust types on one roof, like ridge vents with power fans, which can short-circuit airflow. During roof shingle replacement, this is the moment to correct old sins. If your last roof looked baked and brittle on the south-facing slope after only a dozen years, examine the venting scheme before blaming the shingle brand.
Plan your layout like a mason, finish like a painter
A roof that looks right from the street was not an accident. It started with a layout that accounted for reveal, overhangs, rake trims, and how the shingle pattern lands at terminations. Chalk clean lines. Establish your exposure. On laminated architectural shingles, keep the manufacturer’s exposure consistent. On three-tab, layout affects how your keyways align and whether you present a clean, repeatable pattern. Resist the temptation to eyeball. Over forty feet, an eighth-inch drift per course turns into an inch and a half of trouble.
Rake and eave overhangs deserve attention. Too much overhang invites droop and cracking. Too little looks mean and can miss the drip edge. Around penetrations, do not piece in slivers that barely catch nails. Cut back and use full-width shingle sections to maintain strength. Think about how the courses will land at a dormer cheek or a skylight so your cuts fall in a way that sheds water and looks purposeful. There is an art to closing a roof at a ridge so that cap shingles sit uniform in the wind’s path, not against it. In coastal towns, I have seen caps nailed against prevailing wind. They did not last a season.
Think beyond the bundle: match product to climate
Not all shingles are equal, and not every “lifetime” label means the same performance in your zip code. Warranties are legal documents, not physics. Look for shingles rated and tested for your weather. In high-wind areas, check uplift ratings and the required nailing pattern to achieve them. In hot climates, reflectivity and algae resistance matter. In snow country, thicker laminates can resist damage from ice creep and stair-step melt patterns.
Underlayment matters here too. Ice and water shield along the eaves is not negotiable in freeze-thaw regions. In coastal zones, upgrade fasteners and flashing metals. For homes shaded by trees, use shingles with robust algae-resistant granules or commit to periodic roof cleaning that is gentle enough not to chase granules down the downspouts. When homeowners ask me whether a premium shingle is worth it, I ask how long they plan to live there and what their weather throws at a roof. If the roof faces southwest sun and storms, the premium line often pays back in years and peace of mind. If it is a simple gable sheltered by taller homes, midrange can deliver the same experience.
Quality control is not a final step, it is a habit
The best shingle roofing contractor builds inspection into the workflow. After each slope, pause and scan. Are the nail heads flush and covered? Are the courses straight? Did the crew switch bundles frequently to avoid color blotching? Are the waste cutoffs managed so no small pieces sneak into areas that need full strength? On a hot day, has the crew’s foot traffic scuffed shiny patches that need attention?
I keep a short-punch checklist and I apply it several times during the day. Catching a drift by the fourth course is easy. Catching it by the fortieth means tearing off. Color consistency is another overlooked detail. Shingle dye lots vary slightly. Pull from multiple bundles at once to blend. I learned this in a hard way on a large hip roof where one palette delivered a subtly different hue. Under shade it looked fine. In full sun the patch screamed. We reroofed a plane to make it right.
When repair makes more sense than replacement
Not every problem calls for a full tear-off. Roof shingle repair can buy years if the underlying system is sound. If a branch scuffed a slope, but the deck is solid and the roof is under ten years old, replacing affected shingles and reworking flashing in that area can be both economical and sensible. The key is honest diagnosis. If tabs are curling, granules are sparse in the gutters, and you can see widespread cracking, patching is lipstick. Go for roof shingle replacement and reset the clock.
Be mindful of layering. Some jurisdictions allow a second layer of shingles. I rarely recommend it. Stacking a new roof over an old one hides problems, adds weight, and makes all the delicate work at flashings and penetrations sloppy. A tear-off gives you the chance to correct substrate issues, improve ventilation, and seal the envelope properly. The only times I have blessed an overlay were on small outbuildings with simple geometry where budget was tight and the original layer was flat and sound. On a home that protects people and possessions, a clean start is nearly always the right call.
A short, practical checklist for the day of install
- Confirm deck integrity and fasten loose sheathing before underlayment goes down. Install drip edge, ice and water membrane, then synthetic underlayment with correct laps and fasteners. Use proper starters at eaves and rakes, with correct overhangs and adhesive orientation. Nail in the designated strip, four to six nails as required, flush not overdriven, with lot-blended shingles. Execute flashing details step by step: step flash walls, kickouts at terminations, proper valley method, and ridge ventilation balanced with intake.
Small details that separate a decent job from a flawless one
Little decisions add up. Use a hook blade for long, clean shingle cuts. Trim fresh edges, not brittle sections baked by the sun. Avoid running a closed-cut valley with the cut side facing the direction of prevailing wind. It will lift sooner. When installing ridge caps, follow the shingle maker’s guidance on exposure and nail placement, and close the ridge such that the laps shed toward the leeward side. If you need to hand-seal tabs in cold or high-wind conditions, use a modest dab of roofing cement, not trowel-thick gobs that trap moisture and make future roof shingle repair messy.
Keep the site clean as you go. Stray nails find tires. Granules clog gutters. A tidy site also makes it easier to catch mistakes before they hide under the next course. I carry a magnet sweeper and use it mid-day, not only at the end. When a homeowner sees your crew picking up, they assume you care about the roof details too. They are usually right.
What homeowners should ask their contractor
If you are hiring rather than swinging the hammer, ask targeted questions that reveal method, not just confidence. How do you handle ventilation balance? What is your standard valley detail and why? Will you hand-seal in cold weather, and how do you decide when that is necessary? What underlayment do you use, and where will you place ice and water membrane on my roof? Can you walk me through your nailing pattern? Do you pull shingles from multiple bundles to blend colors?
A seasoned shingle roofing contractor will answer without sales talk and may even pull a sample to demonstrate. Ask about manufacturer certifications and whether the crew on your roof matches the credentials on the brochure. Finally, ask for addresses of roofs they did five to ten years ago. Fresh work always looks good. Roofs age in the truth.
Cost, schedule, and the wisdom to pause
Homeowners often push for speed because roofing feels disruptive. A typical single-family home with a simple gable can be completed in a day or two by a well-coordinated crew. Complex mansards, multiple dormers, and detailed flashing work stretch that timeline. The urge to finish before the weekend can tempt shortcuts that trade hours today for headaches tomorrow. If unexpected rot appears at the eaves, pause, replace the bad sections, and rebuild the overhang properly. If wind rises mid-afternoon and threatens to lift half-adhered shingles, stop and secure what you have. A good crew communicates these decisions plainly and documents what they found, what they fixed, and why the schedule moved.
Pricing reflects scope more than square footage alone. Steep pitches require more staging and labor. Tear-offs with multiple layers cost more in disposal and time. Upgrading to premium shingles, stainless fasteners, and full ice and water coverage at low-slope areas adds line-item dollars, but those dollars are buying risk reduction. Ask for an itemized estimate so you can see where decisions affect cost.
The payoff of doing it right
A clean, straight, watertight roof disappears from your daily life, which is the highest compliment a roof can earn. It rides out storms without shedding shingles. It keeps the attic dry and temperate. It drains water away from chimneys and walls, and the gutters stay clear because the starter and drip edges do their job. When the time comes for a small roof shingle repair, you or your contractor can work on it without unraveling a mess.
The ten tips here sound simple on paper. In practice, they add up to a discipline. Prep the deck. Time the work to the weather. Use the right underlayments. Align and seal the starters. Nail where you should, how you should. Flash with respect for water. Vent so the roof can breathe. Lay out with care. Match the product to the place. Inspect as you go. If you are taking on a shingle roof yourself, hold yourself to that standard. If you are hiring, find the crew that talks about these details unprompted. That is how you get a roof that looks good on day one and still looks good on day five thousand.
Express Roofing Supply
Address: 1790 SW 30th Ave, Hallandale Beach, FL 33009
Phone: (954) 477-7703
Website: https://www.expressroofsupply.com/
FAQ About Roof Repair
How much should it cost to repair a roof? Minor repairs (sealant, a few shingles, small flashing fixes) typically run $150–$600, moderate repairs (leaks, larger flashing/vent issues) are often $400–$1,500, and extensive repairs (structural or widespread damage) can be $1,500–$5,000+; actual pricing varies by material, roof pitch, access, and local labor rates.
How much does it roughly cost to fix a roof? As a rough rule of thumb, plan around $3–$12 per square foot for common repairs, with asphalt generally at the lower end and tile/metal at the higher end; expect trip minimums and emergency fees to increase the total.
What is the most common roof repair? Replacing damaged or missing shingles/tiles and fixing flashing around chimneys, skylights, and vents are the most common repairs, since these areas are frequent sources of leaks.
Can you repair a roof without replacing it? Yes—if the damage is localized and the underlying decking and structure are sound, targeted repairs (patching, flashing replacement, shingle swaps) can restore performance without a full replacement.
Can you repair just a section of a roof? Yes—partial repairs or “sectional” reroofs are common for isolated damage; ensure materials match (age, color, profile) and that transitions are properly flashed to avoid future leaks.
Can a handyman do roof repairs? A handyman can handle small, simple fixes, but for leak diagnosis, flashing work, structural issues, or warranty-covered roofs, it’s safer to hire a licensed roofing contractor for proper materials, safety, and documentation.
Does homeowners insurance cover roof repair? Usually only for sudden, accidental damage (e.g., wind, hail, falling tree limbs) and not for wear-and-tear or neglect; coverage specifics, deductibles, and documentation requirements vary by policy—check your insurer before starting work.
What is the best time of year for roof repair? Dry, mild weather is ideal—often late spring through early fall; in warmer climates, schedule repairs for the dry season and avoid periods with heavy rain, high winds, or freezing temperatures for best adhesion and safety.